Supported by Misha Naimark. To contact me you can send E-mail to ![]()
or you can reach me by phone in Moscow (495) 334-83-20
Building of the second boat at Foteviken, Sweden
Reconstruction of a seagoing sewn ship - Murman shnjaka.
Sewn Boat Homepage
|
|
|
Building of the second boat at Foteviken, Sweden |
|
Reconstruction of a seagoing sewn ship - Murman shnjaka. |
Sewn boats and other ancient watercraft reconstruction links
Sewn boat reconstruction
For at least a thousand years most of the boats in rural areas of Northern Europe and NW Russia were built without metal nails -- their planks were connected by means of an especial technique, in a way similar to sewing or stitching. Holes were drilled in the overlapping parts of the clinker planking, and some sewing yarns were fed through the holes to lace the strakes together; for this sewing material roots of some trees, like spruce or pine, were commonly used. These trees have very long and flexible roots of remarkably even thickness -- a spruce root can be 2 meters long and as thin as a pencil -- from 8 to 4 millimetres in diameter. The roots were the most cheap and available material -- they grow in abundance right in the upper layer of soil in spruce woods, and, as the soil is very soft and loose there, one can easily gather them with bare hands, without any digging with a spade, etc. ( See pictures: growingroots1.jpg , growingroots2.jpg , growingroots3.jpg ; an open leatherman penknife of total length 30cm is placed in the frames for the scale.)
Gathered roots must be cleaned from the bark (which is also loose and peels off quite easily) and immediately immersed into a bucket of tar; the roots are soft only while they are fresh and wet, but when they get dry they become quite crisp and stiff. So the roots are to be kept immersed in the tar, and taken out just before sewing. To protect them against rotting and deteriorating in the boat, the roots must be boiled in the tar until they are completely impregnated with it; this will make them softer, too.
Thus prepared, the spruce roots are flexible enough for sewing; but if a root is too thick and stiff, one can easily rip it lengthwise into two equal thong-like parts, which are very fit for sewing. Each part can further be ripped into halves to obtain thin and flexible enough yarns (See picture rootyarns.jpg , 30cm ruler is given for the scale). Usually thick roots were split into yarns this way, and sometimes several such yarns were twisted together into strands and used for sewing instead of whole roots.
The technique of boat sewing ascends from the stone age and survives almost until our days -- last sewn boats could be seen in rural places of NW Russia (Carelia, Murmansk and Archangelsk regions) as late as in 1950ties. Sewing technique varied in different lands and regions, as well as in different time periods; you can find a comprehensive overview in Christer Westerdahl's paper - "Sewn boats of the North: A preliminary catalogue with introductory comments" . Here I can only describe the technique peculiar to Eastern Carelia in our century. The sewn boat replica was built in old village of Kansanavolok , in Vodlozero National Park .
My information sources were following:
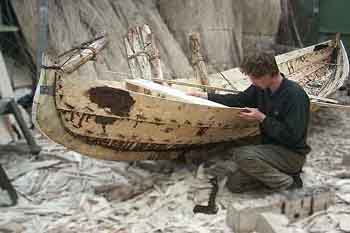
The sewn boat replica was built without using any industrial-made materials and without using modern tools. The only tools used were an ax, a knife, brace and bit, and an auger. (The use of saw was very limited in the area just a hundred years ago -- saw could hardly be wrought and properly hardened by quenching in a blacksmith, and it cannot be sharpened with a whetstone -- a file is needed to sharpen it. So most peasants in rural places managed without saws; often they used to come to some remote lake in the woods, and build a boat there, using only the tools they had upon their persons). I did not use saw when building the boat. Planks were carved with the ax out of slabs; the slabs were obtained by cracking pine logs lengthwise by means of wooden wedges. I tried to crack each log into four slabs, but did not always succeed. Finally, three logs sufficed for eight planks, each side of the boat having four strakes. Planks were 15-17mm thick, some of them up to 30cm wide at the bottom. Edges of a boat strakes must be shaped "like a banana" -- they are bent upwards and become narrower at the prow and at the stern; the upper strake so much so, that no plank can be wide enough to allow for it. On this reason the upper strake has a joint amidships .
The design of the prow is quite similar that of the stern , they differ only in proportions. Both prow and stern timbers were carved out of the lover part of a spruce trees, where they had big and thick roots growing at right angle to the tree body; the inclined parts of the timbers were made of tree body, and the upward pointed parts -- of the root. The joint between the prow timber and keel is shown on the pictures joint.gif and joint.jpg . For the ribs I had to find in the forest some suitably curved trees or thick tree boughs; usually the ribs were carved out of lower parts of spruces -- when a young tree was bent to the ground by snow or by another fallen tree, and if it continue to grow, gradually resuming its vertical position, then its lower part acquires such a curved arch-like shape, located partly above the ground and partly beneath it. Some ribs at the prow could be made of a spruce body and its root, growing at a right angle, just like stern and prow timbers. Some ribs consisted of two curved parts. The gunwales were carved out of two young spruces about 18cm in diameter at the stump.
The building consequence is following: first, prow and stern timbers are to be attached to the keel. Then, a first strake must be fitted scrupulously into its place -- this is the most critical part of the whole job -- the first strakes are twisted and bent very tightly, and they show a strong tendency to crack lengthwise. All the time the strake plank is mounted in its place by means of wedged clamps. Then it is to be removed, the grooves for it in the keel, prow and stern timbers are to be smeared with tar and laid with tar-drenched moss; now the plank can be mounted on clamps again, and, finally, you can sew it to the boat. All the next strakes go in exactly the same way (see construction.gif ). Ribs must be fitted into their places only after all the strakes are sewn and the hull took its shape; (with the exception of the middle rib, which falls on the joint of the upper strake and was put before it to facilitate the making of the late joint.) Ribs are sewn to the planking just like planks are sewn together; but to the keel ribs are attached by big treenails (~2cm in diameter). Gunwales go last; they are sewn to the inside of the upper strake , and pointed wedge-shaped ends of the ribs are clamped in especial notches between the gunwale and the strake to strengthen the whole structure.(See crossection.gif ).
To sew strakes together , one have to drill holes -- they were 7-8mm in diameter, and 3-7cm apart. They go obliquely to the plank surface, to smoothen sharp corners for the roots. Holes are arranged in little zigzags to reduce the risk of plank cracking along the grains. Then one have to cut grooves between the holes in order to sink partly the protruding parts of the root stitches . (These protruding parts are the most vulnerable spot of the boat: they are subject to wearing out both from outside -- by friction against stones when shoving the boat ashore, and from inside by feet of the crewmen.) Root can be fed trough several holes in row and fixed in the first hole by alder treenail; the treenail should be driven into the hole as far as it will go with a hammer, and cut flush with the plank surface afterwards. I used to tighten the root to a certain extent by inserting a small stick or a hammer haft between the plank and the stitch and using it like a lever; but from the Christer Westerdahl paper I learned that a specific T-shaped tool was used for this purpose (See " Skolt Saami boat builder in 1909 at the village of Notosersk " ) Actually I found this technique insufficient in many cases, and in addition compressed stitches with a clamp. This clamp compression would be impossible when repairing a boat and substituting worn out and broken roots by new ones -- the upper boat strakes and gunwales will prevent you from putting clamps to the lower seams. I think that sewn boat repairing was quite problematic, and I noticed in local people (specifically in old women) some tradition of almost ritual carefulness when shoving a boat ashore. Now it looks rather inadequate, because boats are made with nails. But, beyond any doubt, there was a way to repair a sewn boat -- probably the implementation of the T-shaped tool and the use of strands of several root yarns instead of whole roots would resolve the problem; and the seams of a ready boat, whose planks have adopted their bent shape, would close much easier than the seams between newly bent planks.
When a stitch was properly tightened and compressed with the clamp, you must fix it ultimately by driving the treenail into its hole. There is no connection of any kind between the end of one root and the beginning of the next one; gap between sewing holes of different roots can be as wide as 10-15cm. Actually, owing to that treenail fixation, a stitch would hold strakes together even when the previous and the next stitches are broken; number of stitches is quite excessive, and I believe that a boat will remain in working condition even after a half of its stitches were worn out and broke. Some cracks and clefts in the planks could also be mended by stitching with the roots.
Ready boat must be caulked (just the moss which already was in the seams must be tightened, and the moss sticking out of the seams must be caulked into them or cut off), and thoroughly covered with boiling-hot tar. The tar was obtained from dead dry pine stubs, where it usually accumulates in high concentration. When the wood from these stubs is being heated without access of air, the tar melts and oozes down; in the end of the process only charcoals are left from the wood.
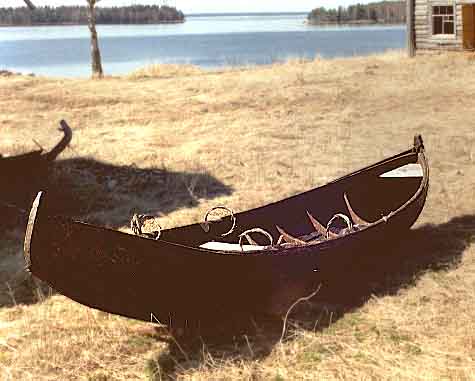
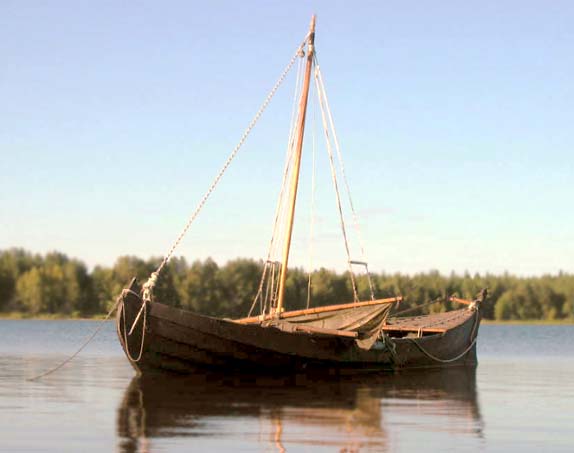
The boat is about 6m long and 1.35m wide (see pictures drawing.gif , sideview.jpg , insideview.jpg , bottom.jpg , prow.jpg , stern.jpg , whole2.jpg ). It can lift up to 6-7 people, but usually the crew in such boats consisted of 2-3 people - one ore two rowing with oars and another one steering with especial steering oar looking rather like a paddle. ( see oars.jpg ). The boat has four oarlocks (their design is very simple -- just wickerwork loops and wooden pins stuck into especial holes in the gunwale), and I maximum three people (usually one or two) could row in a boat like this. The boat can also carry a mast with a primitive sprit sail , but it cannot sail sharp to the wind -- these boats were designed mainly for fishing , which required maneuverability on oars rather than good sailing qualities.
I used the boat for fishing and some short trips for a couple of years, and it proved to be quite consistent -- it does not seem like going to disintegrate, and it does not leak much.